



How to Brew Better Coffee at Home: A Complete Guide
Table of Contents
- The Fundamentals of Brewing Better Coffee at Home
- Coffee-to-Water Ratio Chart and How to Use It
- Best Coffee Grind Size for Brewing Different Methods
- Best Water Temperature for Coffee and Why It Matters
- Brewing Methods Compared: Pour-Over, French Press, AeroPress, and More
- How to Store Coffee Beans for Freshness and Flavor
- The Importance of Fresh Beans and Bean Selection
- Water Quality and Filtration: The Hidden Variable
- Common Mistakes That Ruin Your Coffee
- Equipment Maintenance and Cleaning
Last Updated: August 5, 2026
The Fundamentals of Brewing Better Coffee at Home
The difference between mediocre coffee and exceptional coffee often comes down to a handful of controllable variables. When you brew better coffee at home, you're not fighting against your equipment or your beans, you're working with them. The fundamentals rest on four pillars: water quality, grind consistency, brew time, and temperature. Get these right, and even average beans will taste better. Get them wrong, and premium coffee becomes bitter or sour. This isn't complicated chemistry, it's straightforward mechanics that anyone can master.
Most home brewers skip the basics and jump straight to buying expensive equipment. That's backwards. A $30 burr grinder and proper technique will outperform a $300 machine used carelessly. The goal here is to show you exactly which variables matter most and how to control them.
Coffee-to-Water Ratio Chart and How to Use It
The coffee-to-water ratio is the foundation of repeatable brewing. Without it, you're guessing. With it, you can brew the same cup twice.

The standard ratio most coffee professionals use is 1:16, one part coffee to sixteen parts water by weight. This is a starting point, not a law. Some people prefer 1:15 for a stronger cup, others go 1:17 for something lighter. But 1:16 works for most brewing methods and most coffee preferences.
Here's how to use it:
| Desired Brew | Coffee Weight | Water Weight | Notes |
|---|---|---|---|
| Single cup (8 oz) | 0.5 oz (14g) | 8 oz (227g) | Espresso-sized portion |
| Standard mug (10 oz) | 0.6 oz (18g) | 10 oz (283g) | Most common home brew |
| Large mug (12 oz) | 0.75 oz (21g) | 12 oz (340g) | Longer morning coffee |
| Full pot (40 oz) | 2.5 oz (71g) | 40 oz (1134g) | Brewing for multiple people |
The easiest way to dial in your coffee-to-water ratio is with a kitchen scale. Measure your coffee grounds in grams, multiply by 16, and that's your target water weight. No guessing, no assumptions.
If you don't have a scale yet, get one. A basic digital scale costs under $15 and eliminates the single biggest source of variation in home brewing. Once you start weighing, you'll never go back to eyeballing it.
Best Coffee Grind Size for Brewing Different Methods
Grind size controls how fast water extracts flavor from the coffee grounds. Finer grinds expose more surface area, speeding up extraction. Coarser grinds slow it down. Get the grind size wrong for your brewing method, and you'll either under-extract (sour, thin coffee) or over-extract (bitter, harsh coffee).
The relationship between grind size and brewing method is direct: faster brewing methods need finer grinds, slower methods need coarser grinds.
Espresso requires the finest grind, powder-like consistency. Water is forced through the grounds under pressure for 25-30 seconds, so you need maximum surface area contact in that short window.
Pour-over brewing typically takes 3-4 minutes, so you want a medium-fine grind, similar to table salt. This balance gives you enough contact time without over-extraction.
French press steeps grounds in water for 4 minutes, so use a coarse grind, like breadcrumbs or sea salt. If you grind too fine, you'll get sediment in your cup and bitter flavors.
AeroPress is flexible. It works with medium-fine grinds and shorter brew times (1-2 minutes), or coarser grinds with longer steeping. Most people use medium-fine and get excellent results.
Moka pot uses medium grind, finer than French press but coarser than espresso. The water-based pressure system sits between true espresso and standard brewing.
The best tool for achieving consistent grind size is a burr grinder, either flat burr or conical burr. Blade grinders produce inconsistent particle sizes, which leads to uneven extraction. If you're serious about brewing better coffee at home, a burr grinder is non-negotiable.
National Coffee Association guidelines on grind consistency
Best Water Temperature for Coffee and Why It Matters
Water temperature directly affects extraction speed. Hotter water extracts faster, cooler water extracts slower. This matters because extraction happens on a curve, the first flavors that come out taste good, the last ones taste bitter.
The ideal water temperature for most brewing methods is 195-205°F (90-96°C). This range extracts the desirable flavors without pulling out the harsh compounds that make coffee taste burnt or astringent.
Why not boiling? Boiling water (212°F / 100°C) extracts too aggressively. You'll get bitterness and a harsh mouthfeel. Why not cooler? Water below 195°F under-extracts, leaving the coffee tasting sour and thin.
If you're using a pour-over or French press, let boiling water cool for 30 seconds before pouring. That simple step brings it into the ideal range.
For immersion brewing methods like French press, temperature matters less once the water is in contact with the grounds, the saturation process is more about time than heat. But for pour-over and other flow-based methods, maintaining temperature throughout the brew matters. A gooseneck kettle with temperature control takes the guesswork out, but it's optional if you're disciplined about letting water cool slightly before brewing.
Cold brew is the exception. You're deliberately extracting slowly with cold water over 12-24 hours. The long contact time compensates for the low temperature, producing a smooth, less acidic cup.
Brewing Methods Compared: Pour-Over, French Press, AeroPress, and More
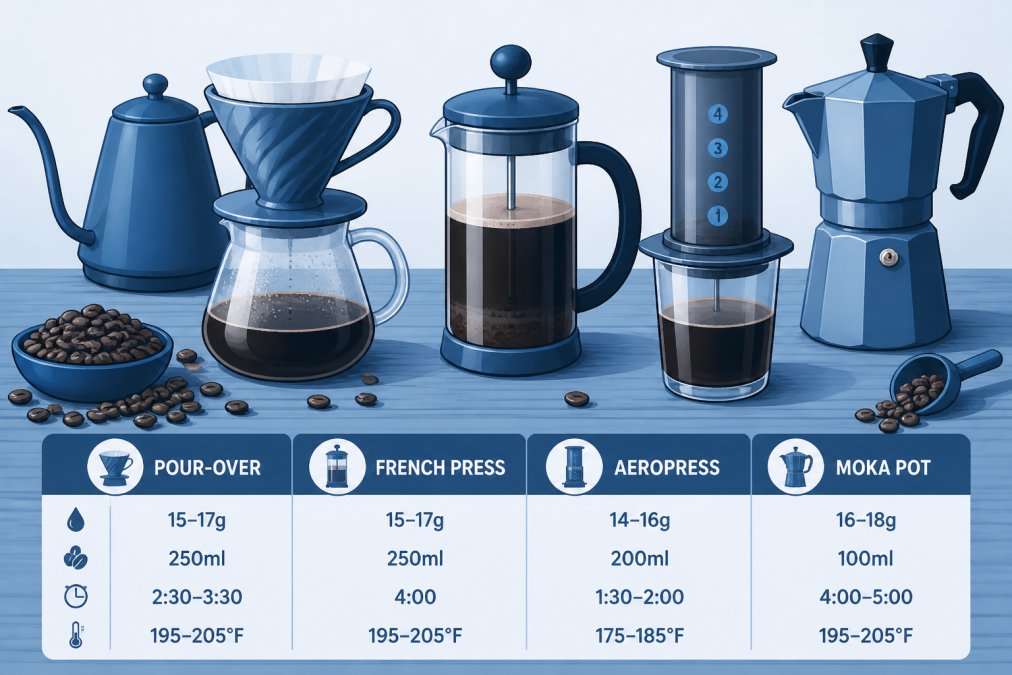
Different brewing methods produce different flavor profiles because they control contact time and filtration differently. Understanding the trade-offs helps you choose the right method for your taste preference and lifestyle.
Pour-Over Brewing
Pour-over is the most hands-on method, and that control is its strength. Water flows through grounds into a filter, then into your cup. The process takes 3-4 minutes and requires active pouring.
The advantage: you can adjust the pour rate to control extraction in real time. If your coffee tastes sour, pour slower next time. If it tastes bitter, pour faster. This feedback loop makes pour-over ideal for learning.
The disadvantage: it requires attention. You can't set it and walk away. If you're rushed in the morning, this method adds friction.
Pour-over produces a clean cup because the paper or metal filter removes oils and fine particles. You get clarity of flavor, the origin characteristics of the bean shine through.
Use medium-fine grind, 195-205°F water, and the 1:16 ratio. Bloom the grounds first (pour just enough water to saturate them, wait 30-45 seconds) before pouring the rest. This allows CO2 to escape and improves extraction.
French Press Brewing
French press is immersion brewing, grounds steep in hot water for 4 minutes, then you press down a metal filter to separate them from the liquid.
The advantage: it's simple and requires minimal equipment. You need only the press itself, no filters, no special technique. It also produces a full-bodied cup because the metal filter allows oils through.
The disadvantage: it's harder to control extraction precisely, and you get sediment in the cup if you're not careful. The full-bodied character that some love, others find too heavy.
Use coarse grind, 195-205°F water, and the 1:16 ratio. Pour water, wait 4 minutes, press slowly. Don't let it sit longer than 10 minutes after pressing, or over-extraction will make it taste bitter.
AeroPress Brewing
AeroPress is a hybrid, it uses pressure (like espresso) but with air, not a pump. Water and grounds mix in a chamber, then you press down a plunger to force water through a paper filter.
The advantage: it's versatile and produces excellent results with minimal learning curve. You can experiment with grind size and brew time to dial in your preference. It's also portable and durable.
The disadvantage: it only makes one cup at a time, and the learning curve is steeper than French press.
Use medium-fine grind, 195-205°F water, and the 1:16 ratio. Brew time is typically 1-2 minutes depending on how fine your grind is. The paper filter produces a clean cup similar to pour-over.
Moka Pot Brewing
Moka pot uses steam pressure to force hot water through grounds into a collection chamber. It's sometimes called a stovetop espresso maker, though it doesn't produce true espresso.
The advantage: it produces a strong, concentrated brew that's excellent for milk-based drinks. It's also inexpensive and doesn't require electricity.
The disadvantage: it's easy to scorch the coffee if you use high heat. Temperature control is less precise than other methods.
Use medium grind, water heated to 195-205°F before adding to the bottom chamber. Fill the filter basket with grounds, screw on the top chamber, and heat on medium until you hear a gurgling sound. Remove from heat immediately, don't let it continue heating, or you'll burn the coffee.
How to Store Coffee Beans for Freshness and Flavor
Coffee beans start losing flavor the moment they're roasted. Oxidation and moisture exposure accelerate the decline. Proper storage slows this process dramatically.
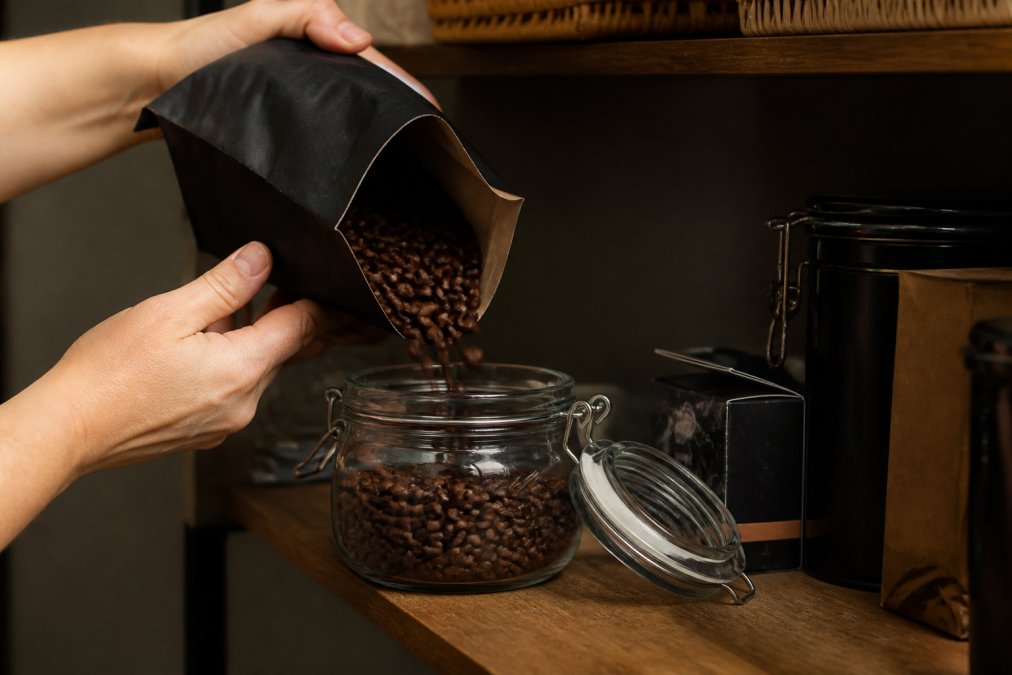
The enemy of fresh coffee is air, light, heat, and moisture. Store beans in an airtight container, away from direct sunlight, in a cool place (ideally 50-70°F). A dark cupboard or pantry is perfect. Never store coffee in the refrigerator or freezer, the temperature fluctuations and moisture condensation degrade the beans.
The best containers are airtight glass or opaque plastic jars with a sealed lid. Many specialty coffee roasters, including Venro Coffee Co., package beans in bags with one-way valves that let CO2 escape without letting air in. If you transfer beans to a container, use one with an airtight seal.
How long do beans stay fresh? Whole beans peak in flavor 5-14 days after roasting and remain good for 3-4 weeks. After that, they're not bad, they just taste flat and lack the brightness that makes good coffee special. Ground coffee loses freshness faster, typically within 15 minutes of grinding, which is why whole beans are always preferable.
Grind beans immediately before brewing. The moment you grind, you expose the interior of the bean to air, and oxidation accelerates. This is why a burr grinder is essential, it grinds quickly and consistently, minimizing the time between grinding and brewing.
If you buy coffee online, check the roast date before ordering. Beans roasted within the last 5-7 days will taste noticeably better than older stock. Venro Coffee Co. ships freshly roasted beans, so you receive them at their peak flavor window. This is a real advantage over buying from a local grocery store, where the roast date is often unknown and the beans may have been sitting for weeks.
The Importance of Fresh Beans and Bean Selection
Fresh beans are non-negotiable for good coffee. Stale beans taste flat and one-dimensional, no matter what brewing method you use. Fresh beans taste bright, complex, and alive.
Freshness starts with the roast date. Look for beans roasted within the last 7-10 days. If the roast date isn't visible, assume the beans are old.
Beyond freshness, bean origin matters. Single-origin beans, coffee from a specific region or farm, have distinct flavor profiles. Ethiopian beans often taste floral and bright. Brazilian beans taste nutty and chocolate-forward. Kenyan beans taste fruity and wine-like. These aren't marketing claims, they're real flavor differences caused by altitude, climate, soil, and processing method.
If you're new to specialty coffee, start with a sampler pack. Venro Coffee Co. offers both a Best Sellers Sample Pack and a Single Origin Favorites Sample Pack, each with multiple varieties. This approach lets you taste different origins and find what resonates with your palate without committing to a full bag of something you might not like.


Blended coffees combine beans from multiple origins to create a consistent flavor profile. They're reliable and often less expensive than single-origin options. For everyday drinking, a good blend is perfectly fine. For exploration and learning, single-origin beans are more educational.
The difference between commodity coffee and specialty coffee is real. Specialty beans are sourced from specific farms, roasted in smaller batches, and handled with care throughout the supply chain. They taste noticeably better. Once you've had good coffee, it's hard to go back to generic grocery store beans.
Water Quality and Filtration: The Hidden Variable
Water makes up 98% of your finished cup of coffee. Bad water produces bad coffee, no matter how good your beans or technique.
Tap water quality varies by location. Some municipal water is excellent, some is heavily chlorinated or mineral-laden. If your tap water tastes off, your coffee will too.
The simplest solution is filtered water. A basic pitcher filter (like Brita) removes chlorine and some minerals. It's inexpensive and noticeably improves coffee if your tap water is treated heavily. If you want to go further, a whole-house filter or reverse osmosis system gives you more control, but it's overkill for most home brewers.
Total Dissolved Solids (TDS) is a measure of minerals in water. Distilled water (0 TDS) doesn't extract coffee well, it pulls out too few flavors. Tap water (200-400 TDS) extracts better. Optimal coffee water has 75-150 TDS. If your water is very hard (high mineral content), filtering reduces TDS and improves extraction.
Specialty Coffee Association water standards
The practical takeaway: if your tap water tastes good, use it. If it tastes chlorinated or off, filter it. Don't overthink this, most home brewers won't notice the difference between filtered tap water and perfectly optimized water. The gap between bad water and decent water is huge. The gap between decent water and perfect water is small.
Common Mistakes That Ruin Your Coffee
Most people make the same mistakes repeatedly. Knowing what to avoid is half the battle.
Using old beans. This is the most common mistake. People buy coffee, store it poorly, and brew it weeks later. By then, the beans have lost most of their flavor. Buy fresh beans and use them within 2-3 weeks.
Grinding too fine. This causes over-extraction, bitter, harsh coffee. If your coffee tastes burnt or astringent, try a coarser grind next time. Many home brewers grind finer thinking it will make stronger coffee. It doesn't, it makes bitter coffee.
Ignoring water temperature. Boiling water straight from the kettle over-extracts. Let it cool 30 seconds. This single change prevents bitterness more effectively than anything else.
Not using a scale. Eyeballing coffee amounts and water amounts leads to inconsistency. You'll never know if a bad cup was the coffee, the technique, or the ratio. A scale costs $15 and eliminates this variable entirely.
Brewing too long. Leaving grounds in contact with water too long (especially in French press) causes over-extraction. Follow the timing for your brewing method and don't improvise.
Using blade grinders. Blade grinders produce inconsistent particle sizes, leading to uneven extraction. Some grounds over-extract (bitter), some under-extract (sour). A burr grinder costs $25-50 and makes a dramatic difference.
Storing beans in the freezer. Temperature fluctuations and moisture condensation degrade beans. Store in a cool, dark cupboard instead.
Brewing with tap water that tastes bad. If your tap water tastes chlorinated or off, filter it. This is an easy fix that dramatically improves coffee.
Equipment Maintenance and Cleaning
Coffee equipment needs regular cleaning. Oils from coffee grounds build up on brewing surfaces, and old coffee residue produces rancid flavors.
For pour-over cones and drippers, rinse with hot water immediately after brewing. Once a week, soak in hot water with a small amount of dish soap, then rinse thoroughly. Paper filters are disposable, replace them each brew.
For French press, empty the grounds immediately after pressing. Rinse the carafe and plunger with hot water. Once a week, disassemble the plunger (most have removable parts) and soak in hot soapy water to remove oil buildup. Dry thoroughly before reassembling.
For AeroPress, rinse the chamber and plunger immediately after brewing. The paper filter is disposable. Wash the rubber seal occasionally with soap and water. If the plunger becomes sticky, a small amount of food-grade silicone grease helps it slide smoothly.
For Moka pot, empty the grounds immediately and rinse all parts with hot water. Never put it in the dishwasher, the high heat can damage the seal. Dry thoroughly and store with the top chamber unscrewed slightly so moisture doesn't trap inside.
For burr grinders, empty any remaining grounds after each use. Once a month, run a small amount of uncooked rice through the grinder to clean the burrs. The rice will grind into powder and help dislodge oils and residue. Empty the powder and any rice particles, then run a small amount of beans through to clear any remaining rice dust.
Descaling is important for any equipment with water contact. Hard water deposits build up inside kettles, pipes, and heating elements. Use a commercial descaling solution monthly if you have hard water, or quarterly if your water is soft. Follow the product instructions.
Brewing better coffee at home isn't complicated, it's a matter of controlling a few key variables and avoiding common mistakes. Start with fresh beans from Venro Coffee Co., use a 1:16 coffee-to-water ratio, grind immediately before brewing, and brew at 195-205°F. These fundamentals work across all brewing methods. Once you've mastered them, explore different origins and brewing techniques to discover what you prefer. The best coffee is the one you enjoy drinking, and getting there is easier than you think.
Frequently Asked Questions
What is the best method for brewing coffee at home?
The best brewing method depends on your preferences and lifestyle. Pour-over offers clean, bright flavors and more control. French press produces a fuller body and richer taste. AeroPress delivers smooth, concentrated coffee quickly. Start with your preferred flavor profile: light and crisp (pour-over), bold and full-bodied (French press), or smooth and balanced (AeroPress). Experiment with freshly roasted beans from quality sources like Venro Coffee Co. to discover your ideal method.
How do I know the correct coffee-to-water ratio for my brewing method?
The standard ratio is 1:16 (one part coffee to 16 parts water by weight). However, ratios vary by method: pour-over typically uses 1:15 to 1:17, French press uses 1:12 to 1:15 for a stronger cup, and AeroPress uses 1:16 to 1:18. Use a kitchen scale for accuracy rather than volume measurements. Start with 1:16, brew, taste, and adjust to your preference. A coffee-to-water ratio chart helps you scale recipes for any batch size.
Why does water temperature matter so much for coffee extraction?
Water temperature directly controls extraction speed and flavor balance. Too cool (below 195°F) results in under-extraction, producing sour, weak coffee. Too hot (above 205°F) causes over-extraction, creating bitter, astringent flavors. The ideal range is 195-205°F for most brewing methods. This temperature range dissolves the right compounds from the coffee grounds, balancing acidity, body, and bitterness. Use a thermometer or gooseneck kettle with temperature control for consistency.
How should I store my coffee beans to keep them fresh longer?
Store beans in an airtight container away from heat, light, and moisture. A sealed glass jar or dedicated coffee canister works best. Keep beans at room temperature, never in the refrigerator or freezer, as condensation degrades flavor. Buy whole beans and grind just before brewing for maximum freshness. Specialty roasters like Venro Coffee Co. ship freshly roasted beans; use them within 2-3 weeks of the roast date for optimal flavor. Avoid clear containers that expose beans to light.
This article was written using GrandRanker